If you’re planning a renovation or knee-deep in one, you already know that cabinetry is a big deal. It’s like the jeans of interior design: if they fit well and look good, the whole outfit (or room) comes together. But finding cabinets that are stylish, well-made, budget-friendly and DIY-friendly? That’s a tall order.
Enter ClickReady Cabinets from Home Depot get them here, a line of ready-to-assemble (RTA) cabinets that are as easy on the wallet as they are on the eyes. I picked them for my laundry room update, and while the project is still in progress, I’ve already assembled and started hanging the cabinets and so far, they’ve been a total win.
I’m breaking down everything you need to know from why I chose ClickReady, to how assembly is going, and what I have planned next.
So, What Exactly Are ClickReady Cabinets?
ClickReady is Home Depot’s exclusive line of semi-custom, RTA (ready-to-assemble) cabinets. Think of them as the overachieving middle child of the cabinet world more flexible than stock, way more affordable than custom, and surprisingly easy to work with. They arrive flat-packed (like your favorite Swedish furniture), but with serious upgrades: solid construction, clean lines, and loads of potential.
These cabinets use a unique, quick-assembly system where orange male and female adapters click together, making the assembly process a breeze. You simply align the connectors and press them together, you’ll actually hear a satisfying “click” when they lock into place. It’s a fast, easy, and secure way to build your cabinets without the need for screws or complicated tools. Whether you’re a first-time DIYer or a seasoned pro, this system makes the whole process smoother and faster.
You’ll find a full lineup of base cabinets, wall cabinets, tall pantry units, and accessories like toe kicks and filler strips. The designs lean classic and versatile (hello, Shaker doors), making them a solid choice whether you’re going for traditional charm or a more modern vibe.
Why I Chose ClickReady Cabinets for My Laundry Room
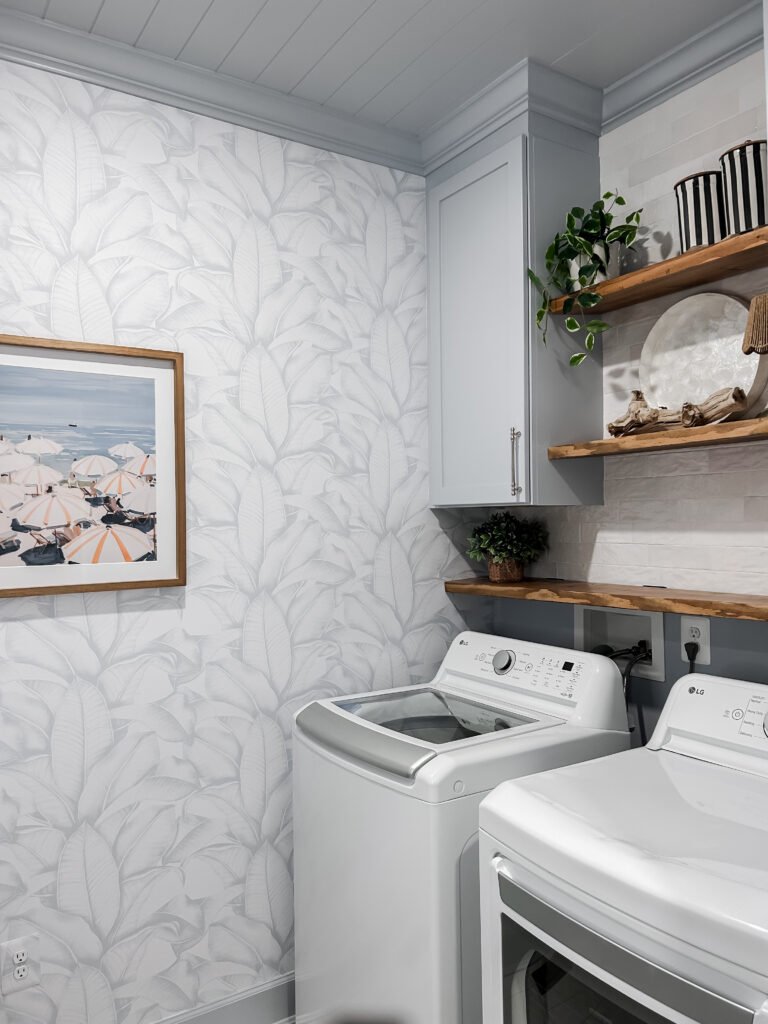
My laundry room has been due for a glow-up, and while the full transformation is still to come, I knew I needed to start with the most essential element: storage.
Here’s why ClickReady made it into my cart:
- Budget-Conscious Without Looking It
Custom cabinets? Beautiful. Also: not in my renovation budget. ClickReady offered the look and flexibility I wanted without the price tag of custom work. - Modular and Mix-and-Match Friendly
With a washer, dryer, utility sink, and not-so-standard dimensions to work around, I needed cabinet sizes that would fit together like puzzle pieces. ClickReady’s wide range of sizes made that totally doable. - Unfinished = Ultimate Flexibility
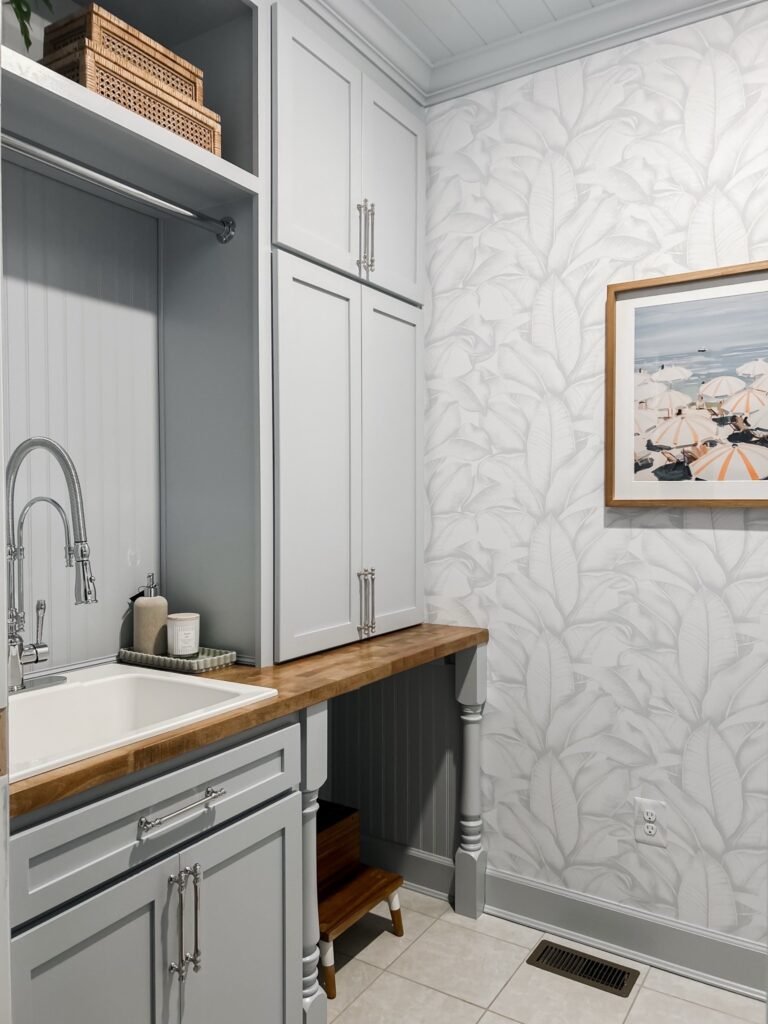
One of the biggest bonuses for me was that these cabinets come unfinished. That means I can prime and paint them exactly how I want no compromising on color or sheen. They’ll be painted a soft light blue to match the wallpaper I’ll be adding later, but for now, they’re in their raw, pre-primer glory. - DIY-Ready
I love a hands-on project, and these cabinets are built for it. No need for a contractor just some basic tools, a little muscle, and a can-do attitude.
No Fancy Design Tools. Just a Tape Measure and a Plan
I didn’t use a fancy kitchen planner or cabinet layout tool. I kept things simple: measured my walls, sketched a few layouts, then matched cabinet dimensions from the Home Depot website to my space.
Once I finalized the layout, I placed my order online and waited for the boxes to arrive. Everything came clearly labeled, well-packaged, and ready to be transformed. It was a little daunting seeing all the flat packs stacked up at first, but also kind of thrilling—like I had a whole room’s worth of potential just waiting to come to life.
Assembly: Simple, Satisfying, and Surprisingly Tool-Free
Watch me put them together here
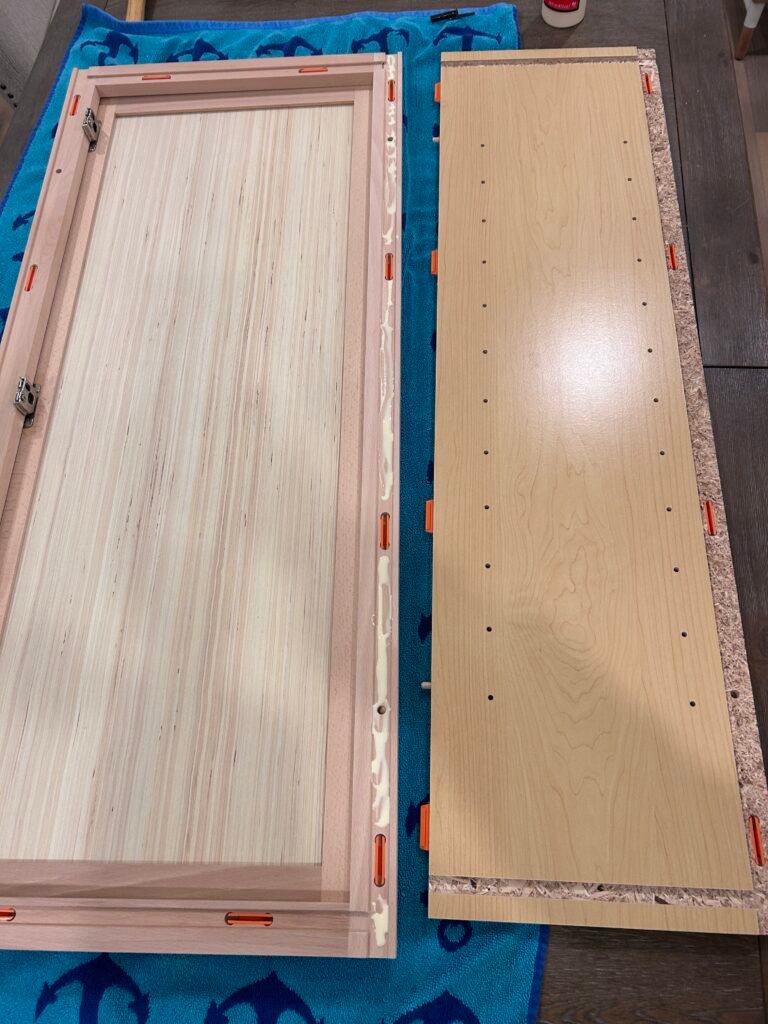
One of the coolest things about ClickReady cabinets? They don’t require screws or predrilled holes. Instead, they use permanent Ready-to-Assemble (RTA) technology, which means every piece literally clicks into place, no joke. It’s almost like cabinet-building magic.
Here’s a breakdown of how I assembled my cabinets:
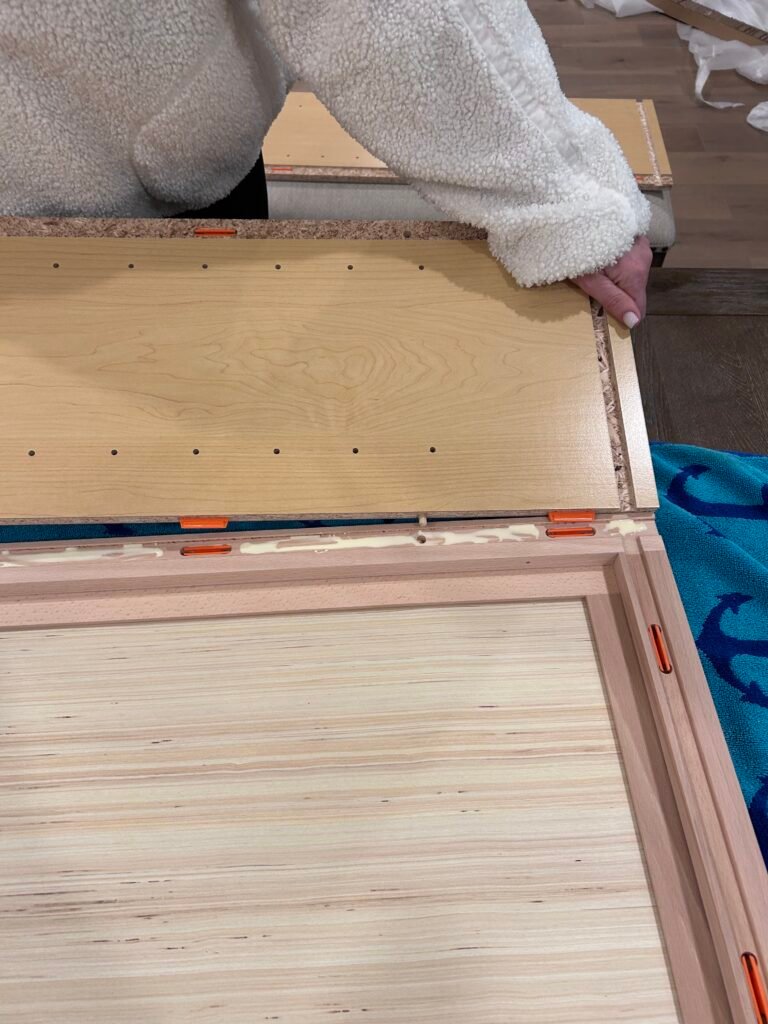
- Attaching the Side Panels to the Face Frame
First, I placed the face frame (C) flat on a smooth surface (I used a towel to avoid scratching it). Then, I installed the two side panels (B) into the mating grooves on the face frame. I aligned the wooden dowels and male connectors on the side panels with the holes and female connectors on the face frame.
Once everything was aligned, I pressed firmly to lock the connectors into place. When it was done right, I heard a satisfying “click” as the pieces locked together. - Attaching the Bottom and Top Panels
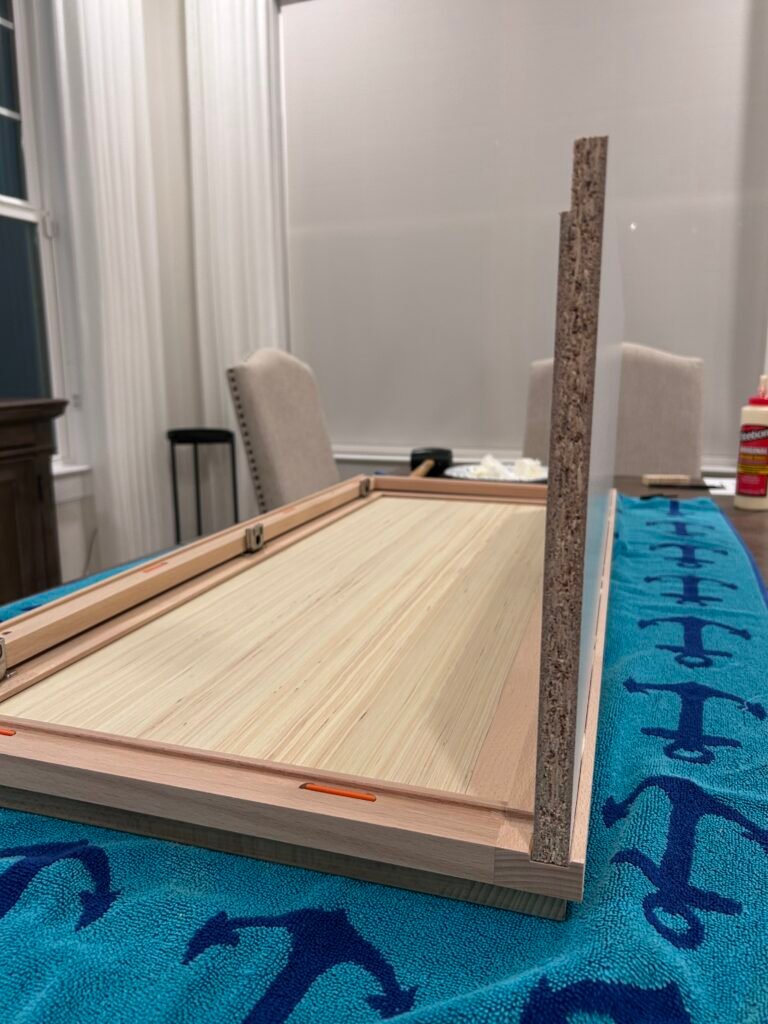
Next, I slid the bottom and top panels (D) into the grooves on the side panels (B). Again, I used my hands to press the panels down firmly, making sure the connectors clicked into place. I had to make sure everything was aligned and locked tightly. - Attaching the Back Panel
With the side panels and bottom/top panels in place, I flexed the side panels outward just a little to fit the back panel (A). The back panel slots into the grooves of the top and bottom panels (D), and I aligned the female connectors on the back panel with the male connectors on the top and bottom panels.
A firm press was all it took to secure the back panel into place with the connectors, once again listening for that sweet click. - Final Side Panel Attachment
The final step was attaching the side panels (B) to the back panel (A). I aligned the male connectors on the back panel with the holes in the side panels and pressed everything inward with my hands to ensure a tight, secure fit.

Extra Tip:
While the instructions didn’t require it, I used wood glue here along the seams of the cabinet (avoiding the actual connectors) for added strength. I placed a light layer of glue before clicking the panels together. It wasn’t in the instructions, but I figured a little extra hold couldn’t hurt. Just a heads-up—this step is optional, but I found it helped add some extra peace of mind!
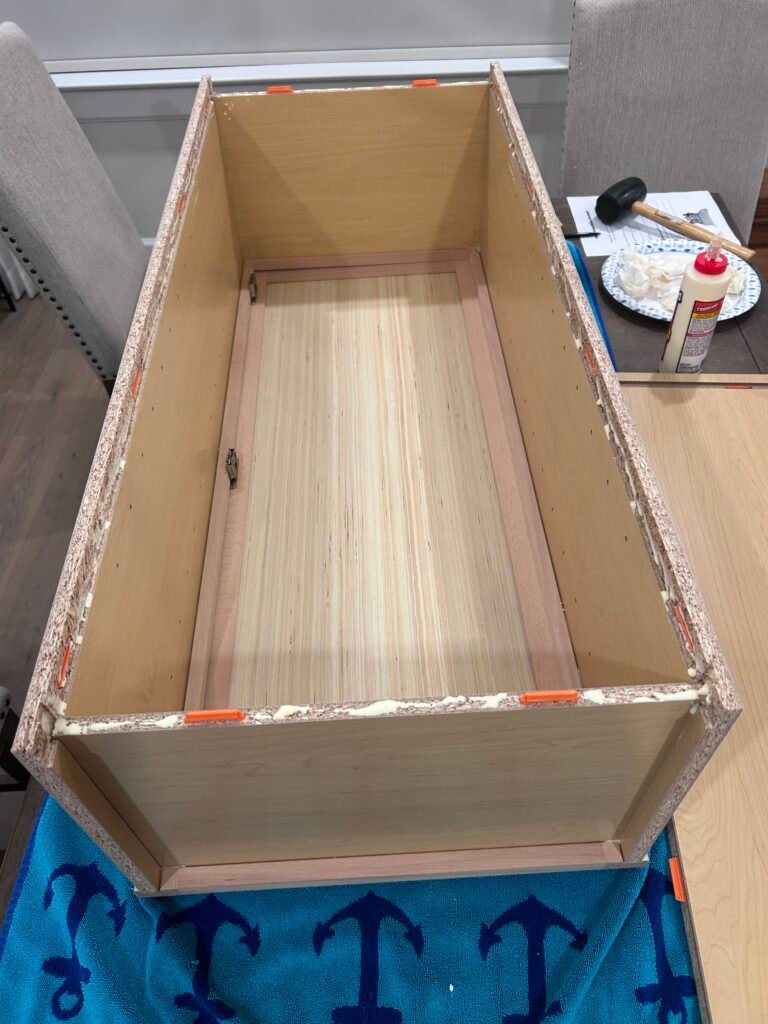
Once all the pieces were in place, I gave the cabinets a quick check to ensure that all connectors were locked and fully seated. Pro tip: Be sure to check everything before hanging the cabinet—this part is crucial because once everything’s clicked in, there’s no going back.
IMPORTANT:
Before putting the cabinet into use, make sure to use a rubber mallet and wooden pad to tap all locations with connectors to ensure they lock together tightly. The wooden pad helps avoid damaging the product during the tapping process.
What’s Next: Custom Touches Coming Soon
Even though the cabinets are only partially installed right now, I already have plans for how I’ll customize them to make them look completely built-in and totally “me.” That includes:
- Priming, sanding, and painting them a beautiful light blue to coordinate with the wallpaper I’ll be adding later.
- Installing crown molding along the top for a high-end, finished look.
- Adding filler strips to close any gaps and make everything look seamless.
- Upgrading the hardware with polished nickel pulls that tie into the other fixtures.
Right now, the cabinets are in their raw state, but that’s part of the fun—they’re a blank slate just waiting for the transformation.
Final Thoughts: Are ClickReady Cabinets Worth It?
Even at this stage, I’m fully impressed with what ClickReady has to offer. These cabinets are solid, simple to assemble, and leave plenty of room for creativity. Whether you’re a seasoned DIYer or just dipping your toes into your first big home project, they’re a great way to get that polished look without blowing your budget.
Here’s the recap:
Pros
✅ Budget-friendly with a high-end feel
✅ Modular sizing that’s easy to configure
✅ Unfinished = fully customizable
✅ DIY assembly that’s fast and straightforward (it took me less than 15 minutes per cabinet!)
✅ Quick shipping and easy delivery
Cons
❌ None so far—just remember to take your time during assembly to ensure everything clicks into place!
I still have a lot left to do, but I can confidently say ClickReady was the right choice for this project. And once the paint, trim, and details come together? These cabinets are going to look so custom, you’d never guess they came flat-packed in boxes.
Have Questions?
If you’re thinking about using ClickReady Cabinets and want the scoop on sizing, ordering, or assembly tips, drop your questions in the comments, I’d love to help!
Disclaimer: This post contains affiliate links. If you purchase through them, I may earn a commission at no extra cost to you